10 min to read
[Spring]Spring MVC JUnit 활용하기2(MockMvc를 활용한 Controller 단위테스트)
Spring MVC 프로젝트에서 JUnit과 MockMvc를 활용한 Controller 단위테스트하기

Spring MVC JUnit 활용하기 에서 JUnit을 활용한 서비스 단위테스트를 진행하였다. 이번에는 JUnit과 MockMvc를 활용하여 Contrller의 단위테스트를 진행해보도록 하자.
- MocMvc란?
브라우저에서의 요청과 응답을 의미하는 객체로서 Controller 테스트를 용이하게 해주는 라이브러리이며 기존의 MockHttpServletRequest, MockHttpServletREsponse를 활용한 단위테스트에서 발전되었다. MockMvc는 Spring3.2부터 사용 가능하며 Spring-test 라이브러리에 포함되어 있다.
- MockMvc를 활용한 Controller 테스트 방법
1) pom.xml에 spring-test 및 JUnit 라이브러리를 추가한다.(maven repo에서 최신버전으로 적용한다.)
        <dependency>
            <groupId>org.springframework</groupId>
            <artifactId>spring-test</artifactId>
            <version>5.1.2.RELEASE</version>
        </dependency>
        <dependency>
            <groupId>junit</groupId>
            <artifactId>junit</artifactId>
            <version>4.12</version>
            <scope>test</scope>
        </dependency>
        <dependency>	<!-- WebAppConfiguration을 사용하기 위함 -->
            <groupId>javax.servlet</groupId>
            <artifactId>javax.servlet-api</artifactId>
            <version>4.0.1</version>
        </dependency>
2) Test 대상인 클래스를 생성한다.(서비스, 컨트롤러)
src/main/java/com/test/service/TestService.java
package com.test.service;

import org.springframework.stereotype.Service;

@Service
public class TestService {

    public boolean numberCompare(int number1, int number2) {
        if (number1 == number2) {
            return true;
        } else {
            return false;
        }
    }
}
src/main/java/com/test/controller/TestController.java
package com.test.controller;


import com.test.service.TestService;
import lombok.Setter;
import org.springframework.beans.factory.annotation.Autowired;
import org.springframework.web.bind.annotation.GetMapping;
import org.springframework.web.bind.annotation.RequestParam;
import org.springframework.web.bind.annotation.RestController;

@RestController
public class TestController {

    @Setter(onMethod_ = {@Autowired})
    private TestService testService;

    @GetMapping(value = "/test")
    public boolean test(@RequestParam int number1, @RequestParam int number2) {
        return testService.numberCompare(number1, number2);
    }
}
3) test/java 밑에 JUnit 컨트롤러 테스트 클래스를 생성한다.(이 블로그에서는 test/java/com/test/ControllerTests.java 생성)
package com.test;


import com.test.controller.TestController;
import org.junit.Before;
import org.junit.Test;
import org.junit.runner.RunWith;
import org.springframework.beans.factory.annotation.Autowired;
import org.springframework.test.context.ContextConfiguration;
import org.springframework.test.context.junit4.SpringJUnit4ClassRunner;
import org.springframework.test.context.web.WebAppConfiguration;
import org.springframework.test.web.servlet.MockMvc;
import org.springframework.test.web.servlet.setup.MockMvcBuilders;
import org.springframework.web.context.WebApplicationContext;

import static org.springframework.test.web.servlet.request.MockMvcRequestBuilders.get;
import static org.springframework.test.web.servlet.result.MockMvcResultHandlers.print;
import static org.springframework.test.web.servlet.result.MockMvcResultMatchers.status;

@RunWith(SpringJUnit4ClassRunner.class)
@ContextConfiguration({"file:src/main/webapp/WEB-INF/spring-config/applicationContext.xml", "file:src/main/webapp/WEB-INF/spring-config/dispatcher-servlet.xml"}) // xml 설정을 읽어 스프링 테스트 시작 전 빈 초기화 및 스프링 설정 업로드
@WebAppConfiguration	// WebApplicationContext를 생성할 수 있도록 하는 어노테이션
public class ControllerTests {

    private WebApplicationContext context; // MockMvc 객체 생성을 위한 context
    private MockMvc mockMvc;

    @Autowired
    TestController testController;	// 테스트를 진행할 controller

    @Before
    public void setUp() {
        this.mockMvc = MockMvcBuilders.standaloneSetup(testController).build();     // test를 위한 MockMvc 객체 생성. testController 1개만 주입.
//        this.mockMvc = MockMvcBuilders.webAppContextSetup(this.context).build();  // test를 위한 MockMvc 객체 생성. 스프링이 로드한 WebApplicationContext의 인스턴스로 작동.(standaloneSetup() 중 택 1)
    }

    @Test
    public void test() throws Exception {
        mockMvc.perform(get("/test")        // controller의 /test URI를 get방식으로 호출
                .param("number1", "1")  // 파라미터 number1에 1 입력
                .param("number2", "1")) // 파라미터 number2에 1입력
                .andDo(print())                        // 결과를 print. MockMvcBuilders의 alwaysDo(print())로 대체 가능
                .andExpect(status().isOk());           // 호출 결과값이 OK가 나오면 정상처리
    }
}
4) 코드 간단 설명
4-1) @WebAppConfiguration
- WebApplicationContext를 생성할 수 있도록 하는 어노테이션
4-2) MockMvc
- Controller 테스트를 위한 객체. .perform() 메소드를 지원하며 해당 메소드를 통해 Controller 호출 테스트를 한다.
4-3) setup()
- 테스트 전 셋업코드를 작성한다. 방식은 크게 두가지가 있는데
this.mockMvc = MockMvcBuilders.standaloneSetup(testController).build();는 테스트 할 컨트롤러를 수동으로 주입하는 것이며, 한 컨트롤러에 집중하여 테스트하는 용도로만 사용한다는 점에서 유닛테스트와 유사하다.this.mockMvc = MockMvcBuilders.webAppContextSetup(this.context).build();는 스프링에서 로드한 WebApplicationContext의 인스턴스로 작동하기 때문에 스트링 컨트롤러는 물론 의존성까지 로드되기 때문에 완전한 통합테스트를 할 수 있다.
4-4) perform()
- perform() 안에는 controller 호출 방식인 get(“호출URI”), post(“호출URI”), put(“호출URI”), delete(“호출URI”)가 들어갈 수 있다.(예 : perform(post(“/test”)))
- 또한 get(), post() 뒤에 controller 호출 시 header값인 .header(), accept정보를 설정해주는 .accept(), JSON이나 XML타입을 결정해주는 .contentType(), Post방식일 경우 body값인 .content(), get 방식인 경우 파라미터인 .param() 등을 호출할 수 있다. (예 : post().header(“header1”, “aa”).contentType(MediaType.APPLICATION_JSON_UTF8_VALUE).content(mapper.writeValueString(new inputVO())) ….)
== post() 예제코드 ==
package com.tpcom_apr.service;


import com.fasterxml.jackson.databind.ObjectMapper;
import com.tpcom_apr.controller.HomeController2;
import com.tpcom_apr.domain.OnmsgchkInputVO;
import lombok.extern.log4j.Log4j;
import org.junit.Before;
import org.junit.Test;
import org.junit.runner.RunWith;
import org.mockito.InjectMocks;
import org.mockito.Mock;
import org.mockito.MockitoAnnotations;
import org.mockito.Spy;
import org.springframework.beans.factory.annotation.Autowired;
import org.springframework.http.MediaType;
import org.springframework.test.context.ContextConfiguration;
import org.springframework.test.context.junit4.SpringJUnit4ClassRunner;
import org.springframework.test.context.web.WebAppConfiguration;
import org.springframework.test.web.servlet.MockMvc;
import org.springframework.test.web.servlet.setup.MockMvcBuilders;
import org.springframework.web.context.WebApplicationContext;

import static org.springframework.test.web.servlet.request.MockMvcRequestBuilders.post;
import static org.springframework.test.web.servlet.result.MockMvcResultHandlers.print;
import static org.springframework.test.web.servlet.result.MockMvcResultMatchers.status;

@RunWith(SpringJUnit4ClassRunner.class) // SpringJunit4ClassRunner.class는 spring-test에서 제공하는 단위테스르를 위한 클래스 러너
@WebAppConfiguration    // WebApplicationContext를 생성할 수 있도록 하는 어노테이션
@ContextConfiguration({"file:src/main/webapp/WEB-INF/spring-config/applicationContext.xml", "file:src/main/webapp/WEB-INF/spring-config/dispatcher-servlet.xml"})
public class MockMvcTests {
    @Autowired
    private WebApplicationContext context; // MockMvc 객체 생성을 위한 context
    private MockMvc mockMvc;    // controller에 request를 수행해주는 mock 객체
    ObjectMapper mapper; // 객체를 json 형식으로 변경 시 사용

    @Autowired
    HomeController2 homeController2;

    @Before // @Test 이전에 실행
    public void setUp() {
        this.mockMvc = MockMvcBuilders.standaloneSetup(homeController2).build();
        mapper = new ObjectMapper();
    }
    @Test
    public void testOk() throws Exception {
        mockMvc.perform(post("/test")        // Controller의 /test URI를 Post방식으로 호출
                .contentType(MediaType.APPLICATION_JSON_VALUE)    // contentType은 json 형식
                .content(mapper.writeValueAsString(         // 객체를 json로 변경. content에는 post의 body가 들어감.
                        new TestInputVO(
                                "useService11",
                                "S40",
                                "xxxx",
                                "1111",
                                "2222")))
                .andExpect(status().isOk())                 // 상태값은 OK가 나오면 정상처리
                .andDo(print());                            // 처리 내용을 출력
    }
}
4-5) ResultActions
- MockMvc.perform() 메소드로 리턴되는 인터페이스. 지원 메소드는 andExpect(), andDo(), andReturn() 등이 있다.
- andExpect()는 예상값을 검증한다. assert* 메소드와 유사한 기능이다.(예 : andExpect(status().isOk()))
- andDo()는 요청에 대한 처리를 한다. 보통 print() 메소드를 많이 쓴다.(예 : .andDo(print()))
- andReturn()은 테스트한 결과 객체를 받을 때 사용한다.
4-6) jsonPath
- 위 예제에선 사용하지 않았지만 요청 결과가 json이라면 jsonPath를 사용하여 검증하는 것도 좋은 방법이다.
- 우선 pom.xml에 jsonPath dependency를 추가하고
<dependency> <groupId>com.jayway.jsonpath</groupId> <artifactId>json-path</artifactId> <version>2.4.0</version> </dependency> - jsonPath를 활용하여 인자 한개한개의 값을 검증할 수 있다.
     mockMvc.perform(post("/test1")
             .contentType(MediaType.APPLICATION_JSON_UTF8_VALUE)
             .content(mapper.writeValueAsString(new TestInputVO("11", "22"))))
             .andExpect(status().isOk())
             .andExpect(header().string("ans_cd", "0000"))
             .andExpect(jsonPath("$.value1").value("A"))
             .andExpect(jsonPath("$.value2").isNotEmpty())
             .andExpect(jsonPath("$.value3").value("0000"));
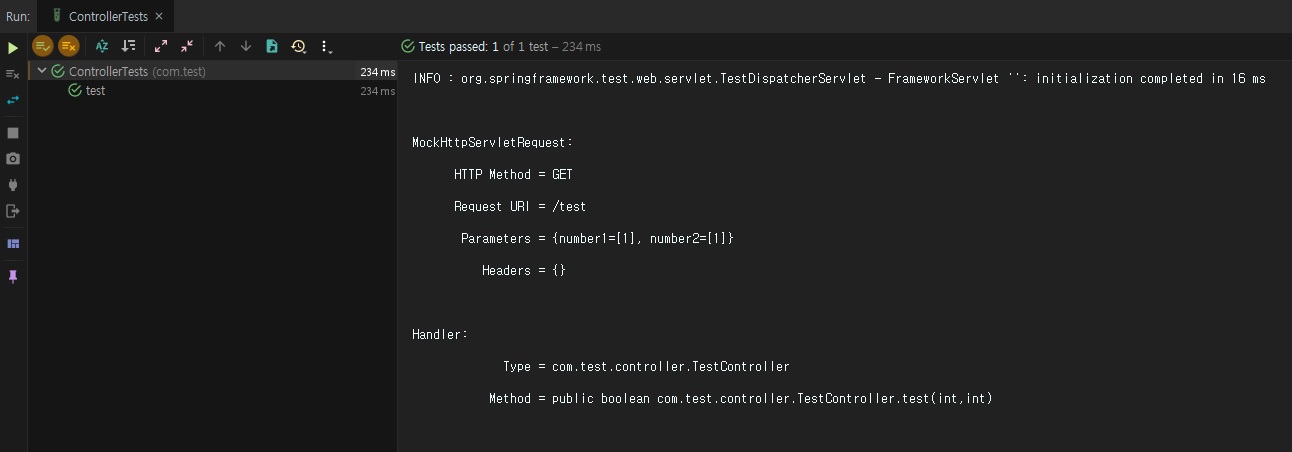
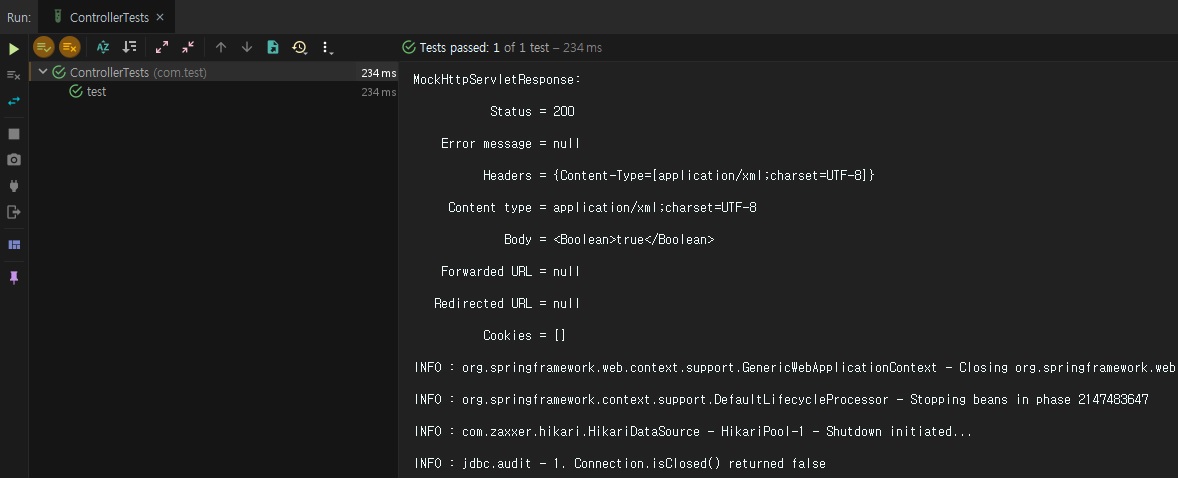
5) JUnit 테스트를 실행한다.(Alt + Shift + F10) 테스트 시 결과가 녹색으로 뜰 경우는 정상, 그렇지 않은 경우 오류가 발생한 것이기 때문에 확인해야 한다.


*출처 : https://jdm.kr/blog/165참고

Comments